

 Sign Out
 View Cart
Share


Drapery 101
How to Ensure a Great Installation
(and a happy client)
How do you have a great installation and a happy client? It’s pretty simple really. Pre-plan! Don’t leave you hardware decisions and ordering to the last moment. Unlike a drapery, hardware can be opened and checked and then put back in the box or on the shelf without harm.
More importantly, it SHOULD be opened and checked. Assume everything is right and you run the risk of going off the install rails before you even begin. Or leave a drapery, shade or top treatment sitting in a box for weeks and you’ll make the job that much harder.
Some wrinkles are bound to occur in transit. Don’t help set them in by putting the box on end (so everything inside slides to the bottom of the box) or leaving them in the box at all. Take the draperies out and lay them flat or over a drapery hanger until ready to install. Besides minimizing wrinkles, it gives you the opportunity to check the length, check the hook setting, and even check for the number of hooks.
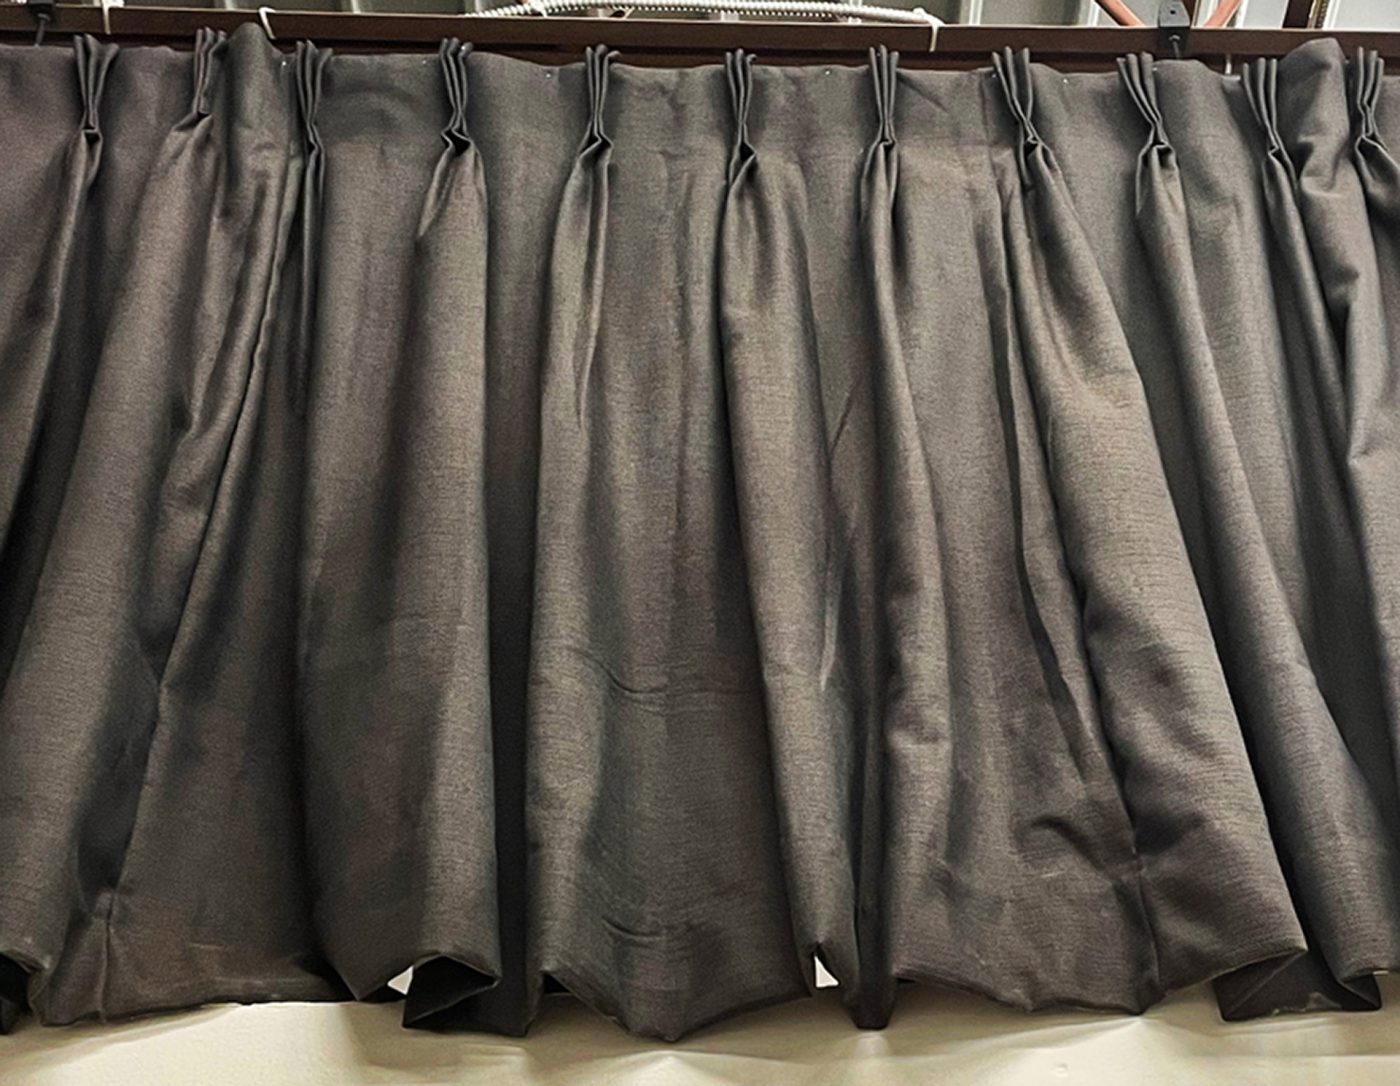
Straight out of a box sitting 3 months unopened (left) vs. laid out properly (right)
First and foremost, hire a good installer. DIY is not a good idea on most window treatments. If your client has spent the time and money buying custom treatments, give them a custom installation. Your husband may be willing, but does he actually know how to install draperies 10 feet in the air?
It involves more than making sure the brackets are level and spaced equally. Installation isn’t just putting the drapery hooks in the carrier or ring eyelet and letting them hang. What if the draperies need to be raised or lowered? Does he know how to do that? Do YOU know how to do that? If there are too many carriers in the rod, does he know how to remove the extras? If draperies are cornered, does he know how to make sure there is no gap between them? If the pleats are wonky, does he know how to dress them? And yes, “dressing” draperies is a real term and involves several steps, like setting the pleats.
Again, do you or the handyman who told you he thinks he can do your installation really know how to do it? Have you set the expectation with your client that the draperies will need to stay tied back for 3-5 days to set the pleats, she/he won’t be traversing them the first night – which is another reason to not schedule an install the day of the party, wedding rehearsal, or whatever event they are having. You can’t finish the job properly, the draperies won’t look their best, and the pressure/tension/friction caused by it can make those hoped for referrals go POOF!

Second, make sure you’ve correctly ordered the necessary parts to insure a good installation. If draperies need to move, you can’t use a regular ring. It won’t go past the brackets. You need to order a C ring that allows it to go around brackets and lets the draperies move as they are supposed to. Nothing is more annoying than draperies that should move but can’t because a bracket stops it.
If you aren’t using C rings, you need to make doubly sure that the pleats are spaced correctly and not bunched on one side of the bracket or the other. There won’t be any going back and quickly moving some – the installer will have to take the rod out of the bracket and move the ring past it, which if it’s a long or heavy drapery can be difficult while balanced on top of a ladder. Ordering the right size of ring is also very important. Ordering too big a ring for the size of the rod (frequently done by the inexperienced because they think they can’t get in trouble that way) creates all kinds of problems. The drop from the rod to the bottom of the ring where the hook goes into the eyelet is a set amount according to the size of the ring. If you use a ring meant for a 2” rod on a 1” rod, you are automatically lowering the length of the drapery because the eyelet the hook goes into is lower from the rod than it should be. If you haven’t deducted for that extra drop, your draperies will be too long.
Getting to an installation is not the time to find out you missed on the number of rings you ordered and will be short. Even if it’s only a ring or two, you aren’t going to run to the neighborhood store and find the same ones, unless you purchased from a neighborhood store to begin with. And, rings are meant to be seen, so there isn’t going to be a way to hide that the late additions don’t match the others. If your installer has to come back to add those rings, its money out of your pocket too. Pre-plan!
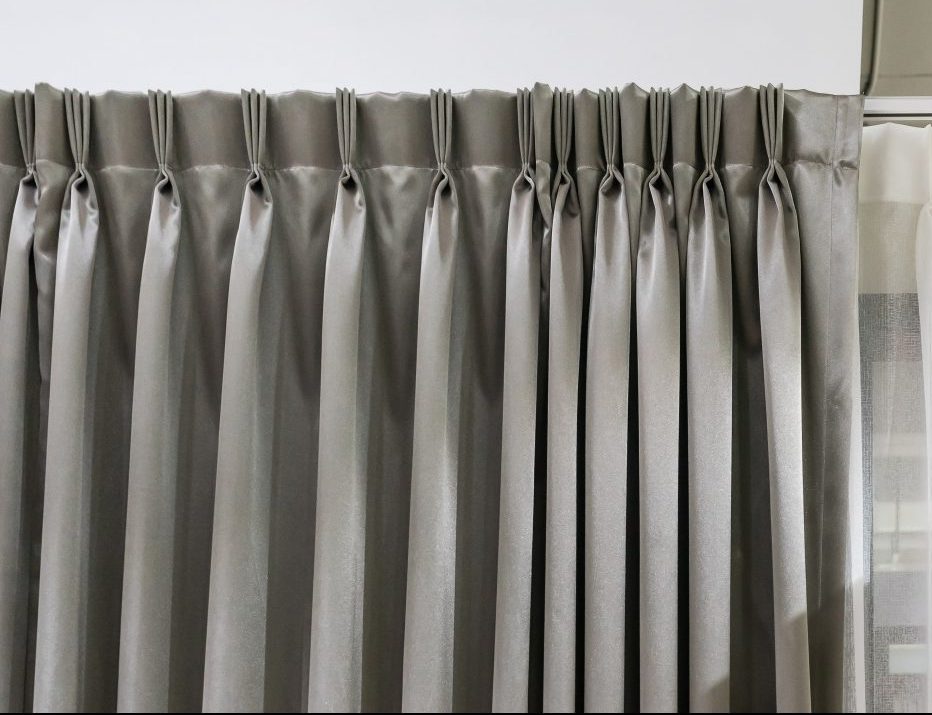
Third, the aforementioned “dressing” draperies is an absolute necessity. There is no drapery that is perfect when it’s first hung. The pleats need to be straightened at the top as well as at the bottom. Pleats that kick out awkwardly or twist are many times doing so because the lining is scrunched and causing a problem. Linings need to be smoothed behind the bottom of the pleat as it can get bunched in transit or as the drapery is hung. This is even more important when using a heavier lining like flame-retardant, blackout or interlining. Dressing or training pleats into the shape they should have will make pleats hang straight, allow you to hide seams at the back of the pleat instead of the front, etc. What is often termed a “quality” issue in the drapery is, in fact, simply a matter of little or poor dressing.
The dressing should first be started at the top of the pleats, then you continue to work down the pleat to the bottom, straightening the fabric and lining, adjusting the seams, smoothing out the wrinkles, etc. Once you position the pleats, they need to banded back for 3-5 days to set the pleats “memory”. A band of plastic from a bag, paper, or even fabric strips can be used to loosely tie the draperies back to keep them from moving. There should be 3 bands – just below the pleats at the top, in the middle, and right above the hem at the bottom. The band needs to be just tight enough to keep from slipping down; too tight will cause wrinkling where the band goes around the drapery. The heavier the weight of the fabric and lining, the longer the drapery needs to stay tied back. Besides training the pleats, this period allows the fabric and lining to acclimate to the temperature and humidity in the house and allows most wrinkles to soften and hang out. Immediate steaming of draperies is not recommended and often, if not done by someone with specific experience in how to do it, will cause more harm than good. At the very least, professional equipment is needed – irons and small hand-held clothes steamers will have little to no effect on hanging draperies.
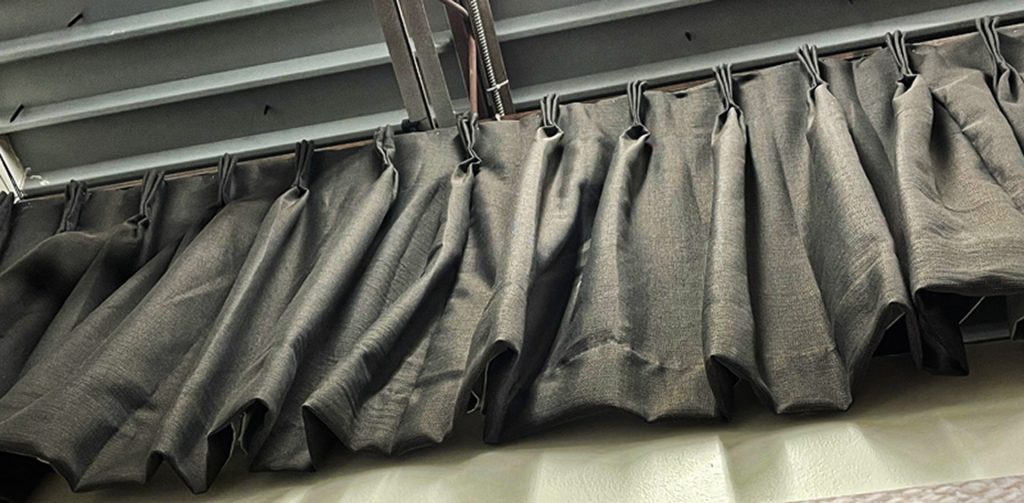
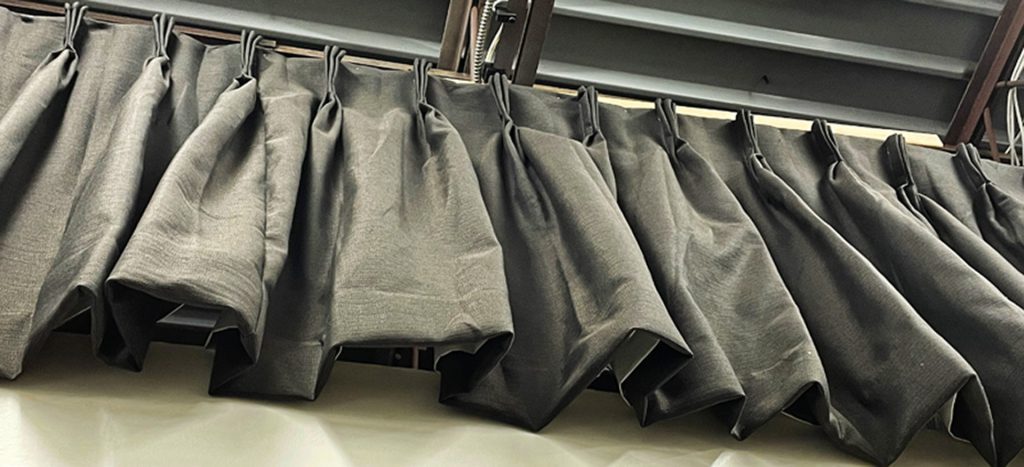
Undressed twisted seams improper spacing no shape
Undressed with twisted seams, no shape
Fourth, be educated enough that when your installer tells you there is a problem, you can reasonably discuss options, not look at him blankly and mumble, “Whatever you think is best…” A less-experienced installer especially needs back up when there is a question or decision to be made. He can’t read your mind about how you wanted it done. And BTW, you should be at the installation, not receiving this news on the phone while you’re meeting with another client or having lunch with friends. Installation is part of a designer’s job, not a hand off to someone else to take care of. It’s as important as specifying the fabric, choosing the lining, and calculating the measurements. If you aren’t doing any of these things, are you really a window treatment expert? Doing windows correctly takes knowledge and experience. You can only get that by being a part of the process, not simply paying others to do it for you and then putting your name on it. Final inspection and tweaks to an installation should always be done by the designer, regardless of whether your client is present or it’s just you, the installer and the dog.

Getting a call from your client about “problems” and you have absolutely no clue what’s gone on at installation is not a call you want. The ball is already rolling downhill and it can be hard to reverse by the time you “stop over and take a look”. Once people decide something is wrong, it can be mighty hard to make them see it’s not. What could be a simple fix or adjustment handled during installation suddenly opens the door to escalating complaints and unhappiness on both sides. Was that time you saved by not being at the installation worth it? Instead of looking at it as time wasted or not productive $ wise, view it as time well spent educating yourself on this vital part of window treatments. It’s amazing what you will learn watching the installation process. You can also use some of the time to take measurements on other windows or rooms you’ll be working on in the future at this location. At the least, it can be useful quiet time you rarely get where you can make phone calls, answer emails, and work on specifications for another project while your installer works. And it’s also great time to interact with your client about other things you’d like to pursue with them if they are there.
And one last thing about being on installations – you can keep pesky husbands or kids away from your installer so he can just work and get the job done without having to explain what he’s doing, receive “helpful” suggestions, or worry about getting knocked off the ladder or equipment played with. (If you go on installations, you already know all of this stuff really happens…) My installer didn’t wear a uniform and probably didn’t impress many when we walked in the door with his beat-up tool box and worn bag of tools. But they could tell I respected and trusted him, and as soon as he started working, clients knew he was experienced. And he could install anything anywhere. He saved me so many times from a return visit or a botched job. Because even when you pre-plan and pre-plan and pre-plan, something unexpected can still happen. Even experts forget things or make mistakes. It happens to all of us at some point. So, if you are blessed with a good installer, treat them like gold. They are the ones who should get a Christmas bonus and birthday present! And take the opportunity to
learn from them – you’ll be glad you did!